


Abstract submission deadlines are fast approaching for two of my favorite conference. The Boston University Conference on Language Development is accepting submissions until May 15. This is the conference I've been attending longest; this Fall will mark my 5th year running.
Architectures and Mechanisms in Language Processing will be accepting submissions from May 1 to May 28. AMLaP is the general European conference for research on language processing (typically, language structures at a level higher than a single word), making it the counterpart to America's CUNY Conference on Human Sentence Processing (which, confusingly, doesn't take place at CUNY). I went to AMLaP for the first time last year and loved it. Hopefully I'll get something accepted this year so I can attend again.
Field of Science
-
-
Change of address8 months ago in Variety of Life
-
Change of address8 months ago in Catalogue of Organisms
-
-
Earth Day: Pogo and our responsibility11 months ago in Doc Madhattan

Cleaning up the tutorial
The last couple tutorial posts had some formatting problems. It's difficult to display HTML code within an HTML file. I've now saved the problematic code as pictures, so they should display correctly now.
Web Experiment Tutorial: Chapter 6, PHP
Several years ago, I wrote a tutorial for my previous lab on how to create Web-based experiments in Flash. Over the next number of months, I'll be posting that tutorial chapter by chapter.
We've now got an experiment and we have a website -- we need to have a way of actually storing the data we collect. To do this, you are going to need a web server with a MySQL database. A decent web hosting company should be able to provide you with this. The discussion in this tutorial assumes you have a web server and access to a MySQL database.
PHP is another Web language. It has many purposes, but here we use it as the interface between our experiment and the MySQL database that stores all the recorded data.
1. What is PHP?
I’m not that sure myself, really. As I understand it, PHP is used to dynamically generate HTML code. In our Flash experiment, we used dynamic text boxes so that we could display different text depending on the occasion. PHP does something similar. The PHP code resides on your web server. When it is called, the web server uses it to create new HTML code on the fly and then sends that to the user’s browser. The PHP code itself should never get sent to the user’s browser.
That is, as I understand it, what PHP is for. However, that is not how we will use it. We will use PHP as a sort of central link in a bucket brigade. User data is sent from the Flash file to the PHP file, and from the PHP file to the MySQL database.
In newer versions of Flash, as I understand it, Flash can interact directly with MySQL, but I've never tried that functionality myself. Flash MX cannot, which is what I started off with. In any case, this works well enough.
2. Sending data to PHP
Open your FLA file. You can start with Part4.fla if you like.
The next to last frame should contain the following code:
if (current_trial==total_trials){
gotoAndPlay('finish');
}else{
current_trial += 1;
trace(current_trial);
gotoAndPlay('Next_Trial');
}
Delete that code and replace it with the following:
stop();
prepareResults();
submitResults();
Now, after the participant receives feedback on each trial, two subroutines will be run: prepareResults and submitResults. Now we will write these subroutines.
Go back to the Initialize frame. At the bottom, type in the following line:
scriptVars = new LoadVars();
This creates a new variable called scriptVars of type LoadVars. You will use this variable to pass information to PHP.
function prepareResults() {
//demographics
scriptVars.subject_age = age;
scriptVars.subject_sex = sex;
scriptVars.subject_vision = normal_vision;
scriptVars.initials = initials;
//experimental data
scriptVars.trial = current_trial;
scriptVars.correct = correct;
scriptVars.stimulus = stimulus;
scriptVars.match = match;
scriptVars.probe = probe;
}
Now, scriptVars contains all the information from the demographic questionnaire as well as the data and stimuli types from the current trial.
Next, we need the code for submitResults. This involves some fancy maneuvering:
function submitResults() {
scriptVars.sendAndLoad("http://URL/submit_vars.php", scriptVars, "POST");
}
scriptVars.onLoad = function() {
if (current_trial==total_trials){
gotoAndPlay("finish");
}else{
currenttrial+=1;
gotoAndPlay("Next_Trial");
}
}
submitResults actually runs a built-in LoadVars function called “sendAndLoad”. There are 3 arguments: the URL of the php file (you’ll need to adjust this to your actual URL where submit_vars.php is sitting), the name of the data structure being sent, and a flag telling the PHP file what to do with it. In this manual, we only ever use the “POST” flag.
Here comes the tricky part. We used the sendAndLoad command, so as soon as the data is sent, Flash runs scriptVars’s “Load” function. So our next code is exactly this function. In here, we write the code that prepares the experiment for the next trial and directs it to the appropriate frame.
There are other ways of accomplishing this same feat. I like this method, because it makes sure the code that iterates trials is easy to find. The most difficult part of programming in Flash is debugging, mainly because it is hard to find the relevant code. The more you use functions and define the functions in the same frame, the easier it is to edit and debug your code.
Your Flash file should now look like Part5.fla.
3. Receiving the code in PHP
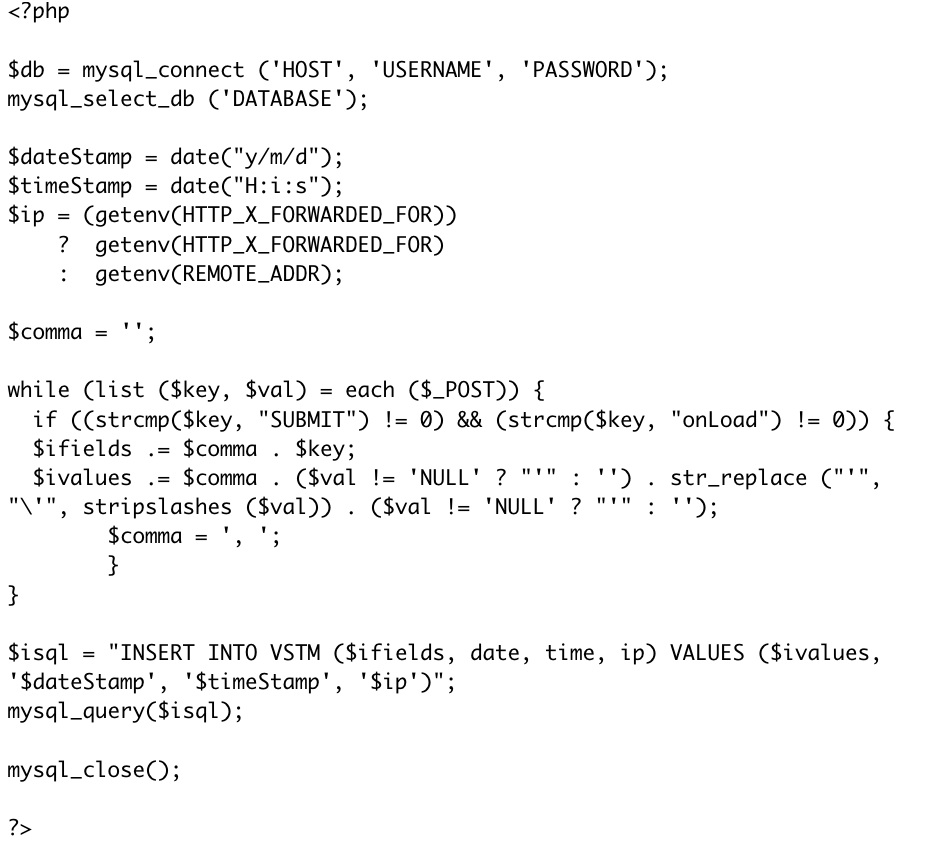
Let’s take a look a the PHP file we called in our code above (I find it easiest to edit this in a simple text editor):

It looks scary, but it turns out that you can ignore most of this code. The PHP file first creates a string of MySQL code. The next line sends runs the mysql_query function with the string as the argument. Then MySQL is closed and the file ends.
There are only three lines of code you need to modify. The top two lines will need to be modified so that the host name, username and password are all correct. This will probably be the same for every experiment, unless different experiments use different databases. You also need to change the $isql = “INSERT INTO ….” line. This tells MySQL which table to insert the data into (see the MySQL chapter). This will probably be different for each experiment.
For this tutorial, you might replace “TABLENAME” with “VSTM”, so that the code reads:
$isql = "INSERT INTO VSTM ($ifields, date, time, ip) VALUES ($ivalues, '$dateStamp', '$timeStamp', '$ip')";
For those who want more detail, read on below:

We've now got an experiment and we have a website -- we need to have a way of actually storing the data we collect. To do this, you are going to need a web server with a MySQL database. A decent web hosting company should be able to provide you with this. The discussion in this tutorial assumes you have a web server and access to a MySQL database.
1. What is PHP?
I’m not that sure myself, really. As I understand it, PHP is used to dynamically generate HTML code. In our Flash experiment, we used dynamic text boxes so that we could display different text depending on the occasion. PHP does something similar. The PHP code resides on your web server. When it is called, the web server uses it to create new HTML code on the fly and then sends that to the user’s browser. The PHP code itself should never get sent to the user’s browser.
That is, as I understand it, what PHP is for. However, that is not how we will use it. We will use PHP as a sort of central link in a bucket brigade. User data is sent from the Flash file to the PHP file, and from the PHP file to the MySQL database.
In newer versions of Flash, as I understand it, Flash can interact directly with MySQL, but I've never tried that functionality myself. Flash MX cannot, which is what I started off with. In any case, this works well enough.
2. Sending data to PHP
Open your FLA file. You can start with Part4.fla if you like.
The next to last frame should contain the following code:
if (current_trial==total_trials){
gotoAndPlay('finish');
}else{
current_trial += 1;
trace(current_trial);
gotoAndPlay('Next_Trial');
}
Delete that code and replace it with the following:
stop();
prepareResults();
submitResults();
Now, after the participant receives feedback on each trial, two subroutines will be run: prepareResults and submitResults. Now we will write these subroutines.
Go back to the Initialize frame. At the bottom, type in the following line:
scriptVars = new LoadVars();
This creates a new variable called scriptVars of type LoadVars. You will use this variable to pass information to PHP.
function prepareResults() {
//demographics
scriptVars.subject_age = age;
scriptVars.subject_sex = sex;
scriptVars.subject_vision = normal_vision;
scriptVars.initials = initials;
//experimental data
scriptVars.trial = current_trial;
scriptVars.correct = correct;
scriptVars.stimulus = stimulus;
scriptVars.match = match;
scriptVars.probe = probe;
}
Now, scriptVars contains all the information from the demographic questionnaire as well as the data and stimuli types from the current trial.
Next, we need the code for submitResults. This involves some fancy maneuvering:
function submitResults() {
scriptVars.sendAndLoad("http://URL/submit_vars.php", scriptVars, "POST");
}
scriptVars.onLoad = function() {
if (current_trial==total_trials){
gotoAndPlay("finish");
}else{
currenttrial+=1;
gotoAndPlay("Next_Trial");
}
}
submitResults actually runs a built-in LoadVars function called “sendAndLoad”. There are 3 arguments: the URL of the php file (you’ll need to adjust this to your actual URL where submit_vars.php is sitting), the name of the data structure being sent, and a flag telling the PHP file what to do with it. In this manual, we only ever use the “POST” flag.
Here comes the tricky part. We used the sendAndLoad command, so as soon as the data is sent, Flash runs scriptVars’s “Load” function. So our next code is exactly this function. In here, we write the code that prepares the experiment for the next trial and directs it to the appropriate frame.
There are other ways of accomplishing this same feat. I like this method, because it makes sure the code that iterates trials is easy to find. The most difficult part of programming in Flash is debugging, mainly because it is hard to find the relevant code. The more you use functions and define the functions in the same frame, the easier it is to edit and debug your code.
Your Flash file should now look like Part5.fla.
3. Receiving the code in PHP
Let’s take a look a the PHP file we called in our code above (I find it easiest to edit this in a simple text editor):
It looks scary, but it turns out that you can ignore most of this code. The PHP file first creates a string of MySQL code. The next line sends runs the mysql_query function with the string as the argument. Then MySQL is closed and the file ends.
There are only three lines of code you need to modify. The top two lines will need to be modified so that the host name, username and password are all correct. This will probably be the same for every experiment, unless different experiments use different databases. You also need to change the $isql = “INSERT INTO ….” line. This tells MySQL which table to insert the data into (see the MySQL chapter). This will probably be different for each experiment.
For this tutorial, you might replace “TABLENAME” with “VSTM”, so that the code reads:
$isql = "INSERT INTO VSTM ($ifields, date, time, ip) VALUES ($ivalues, '$dateStamp', '$timeStamp', '$ip')";
For those who want more detail, read on below:

Web Experiment Tutorial: Chapter 5, HTML for Flash Experiments
Several years ago, I wrote a tutorial for my previous lab on how to create Web-based experiments in Flash. Over the next number of months, I'll be posting that tutorial chapter by chapter.
To do this, you will need to learn a small amount of HTML, MySQL and PHP.
1. What is HTML?
HTML is the bread and butter language of the Web. It is not a programming language in the same sense that C++ or BASIC are. It’s better described as a “mark-up” language. That is, an HTML file is essentially a text document with codes interspersed, telling the web browser how to display that text.
An HTML file can have more than just HTML in it. Frequently, it also contains JavaScript, which are quite different from HTML. We will use both.
An indepth discussion of HTML and JavaScript is outside the scope of this manual. Our purpose here is to learn just enough to allow you to display your experiment to participants.
2. Create an experiment homepage.
I use Dreamweaver to create web pages. Dreamweaver allows a great deal of flexibility in formatting. Having a pretty webpage is not strictly necessary, but the better your webpage looks, the more participants will take it seriously. Think about whether you would rather give personal information to a website that looks like it was created by an orangutan or one that looks like it was created by a highly sophisticated team of programmers.
Download and expand VSTM.zip. Open index.html. Index.html is the experiment’s homepage. It has some nice features you could use, such as a scroll bar for the center frame.
You should edit this page as appropriate. If you have a standard formatting for your website, you can adjust to fit that. One thing to notice is that the name of the laboratory is prominently displayed. This is because people may surf directly to this page. Ideally, you would also have links to the rest of your lab website (that’s what I use the top bar of this page for).
Also, notice that there is very little text. It's often a good idea to have as little text as possible, but at the same time, be as informative as possible. Notice also that the link to the experiment (VSTM) is highlighted so that participants don’t have to hunt around for it.
3. The consent form.
There is a link in the center of the page. The text is “Try the VSTM experiment by clicking here.” This link opens “consent.html”. Consent.html is a fairly simple page and as actually created in a text editor. The participant sees a consent form. This particular consent form was required by the Harvard IRB.
If you want your experiment to pop up in a new window centered in computer screen, you can do this with some JavaScript, which you can find by looking through consent.html:

This sets up a subroutine called “NewWindow” that does two things. First, it will open test_in_progress.html. It will also open another window and center it in the middle of the subject’s screen. This other window will contain the experiment itself (to be discussed in another chapter). Generally in vision experiments, you would like the experimental window to be centered.
This subroutine is called by the link itself. Look towards the bottom of the file:

This code both presents the link to the participant and also causes the new window to appear in the middle of the screen when "Yes, I Agree" is clicked. Notice that the size of the window is set to 650x500. You'll want that to match both the size of the Flash file you've created (slightly larger is OK) and also the dimensions specified in the .php file which will be discussed in the next chapter.
3. The other HTML files.
There are two other HTML files included: test_in_progress.html and done.html. These two are themselves called by PHP files. test_in_progress.html is called by test_popup.php (linked to by Consent.html). It displays below the experimental window itself while the experiment is running. It contains some text telling participants what to do if the experimental window doesn’t show up or if they should leave the experiment early. Done.html is called by the experiment when the subject exits the experiment.
Both are fairly self-explanatory.
The Video Test: Test Your Visual Memory
There's a new experiment at GamesWithWords.org. This one focuses on the relationship between short-term and long-term visual memory. You will watch a video followed by a memory test for the video. We'll compare those results to those of a short-term memory test.
This is one of my personal favorite experiments, mainly because the video is a clip from one of my all-time favorite short films (I was very lucky to get permission from the creators to use it).
It's also one of my longest-running projects. Some of you may remember this experiment, as I've run it before. In fact, there have been something like 12 versions of this experiment run. The results have been interesting, if confusing, but with each experiment our methods get more refined. I think this experiment is the best of the bunch. It will also be the last (it's time to move on to other projects), which means I'll be able to post results for the entire project sometime this summer.
(Some people may wonder why GamesWithWords.org is running a visual memory experiment. Much of my research focuses on the relationship between language and other components of the mind. Occasionally this line of work necessitates and excursion beyond language to those other components of the mind.)
Empirical English
I'd like to point readers to a brief article in the New York Times today discussing new applications of psychological research methods to the study of literature. While it sounds like some of it is based on using neuroscientific methods to answer what are actually behavioral questions, the application of empirical methods is always a good thing. Any statement that makes an empirical claim about the world should be testable in some fashion, and the fact that more and more fields are actually testing the claims they make is progress.
Questions about the tutorial?
Hi folks -- anyone who is trying to use the Web Experiment Tutorial, please do write in (gameswithwords at gmail) or comment with questions. This tutorial was written for Flash MX, and though I actually still run programs that were based in MX and they work fine, there may be adjustments necessary for people using the latest versions of Flash. I'd be interested in hearing if you run into any such difficulties.
Web Experiment Tutorial: Chapter 4, Flash: Finishing Touches
Several years ago, I wrote a tutorial for my previous lab on how to create Web-based experiments in Flash. Over the next number of months, I'll be posting that tutorial chapter by chapter.
1. Getting Reaction Time.
For some experiments, you may wish to record reaction time. Reaction time will not be very accurate in a Web-based experiment. A priming experiment, for instance, would probably not be ideal. However, for larger reaction time effects, this methodology should be sufficient.
You could get a reaction time mouse click in the following manner:
In the “probe” frame, add the following code right after the code that displays the probe:
start_time =new Date().getTime();
Add this code to the “same” and “different” buttons, just before the gotoAndPlay statement:
_root.RT = new Date().getTime() - _root.start_time;
The variable “RT” will now contains the number of milliseconds that passed between the probe display and the mouse release. We could change it to the onset of the mouse click by changing the subroutines in the “same” and “different” buttons to on (click).
However, responding with the mouse is slow, and you would probably prefer using key presses. This is more complicated. Do not try to understand the following method. It frankly makes no sense. Just try to learn how to use it.
First, make an empty text box containing a single space. Convert it to a movie clip named “keyTrap”.
Select “keyTrap” and attach the following code:
onClipEvent(keyDown) {
ResponseKey=Key.getCode();
responseTime=new Date().getTime();
_root.RT=responseTime - _root.start_time;
switch (ResponseKey) {
case 83:
//S
if (_root.match==1){
_root.correct = 1;
}else{
_root.correct = 0;
}
break;
case 68:
//D
if (_root.match==1){
_root.correct = 0;
}else{
_root.correct = 1;
}
break;
}
_root.gotoAndPlay("feedback");
}
The onClipEvent(keyDown) subroutine executes when any key is pressed.
Key.getCode retrieves the ASCII key code for the key that was pressed. The table for a standard keyboard is reproduced below.
The only other novel piece of code here is the switch statement. Switch statements in Flash have the following form:
Switch (VARIABLE) {
case VALUE-OF-VARIABLE:
CODE
break;
Case ANOTHER-VALUE
CODE
break;
}
Without the “break” command, Flash will execute the next line. Consider the following code:
Switch (number){
case 1:
trace(‘1’);
case 2:
trace(‘2’);
case 3
trace(‘3’);
}
This code will count to 3 starting with the value of “number”. If “number” = 1, then it will count: 1, 2, 3. If number=3, it will only count: 3.
(the “trace” command outputs to the output window. This can be seen when running a .fla program within Flash. The code does nothing when running off a website.)
You should also delete the “same” and “different” buttons. Now, you can respond by pressing “s” for “same” and “d” for “different”. Your program should now look like this.
ASCII codes for a standard keyboard:
A 65
B 66
C 67
D 68
E 69
F 70
G 71
H 72
I 73
J 74
K 75
L 76
M 77
N 78
O 79
P 80
Q 81
R 82
S 83
T 84
U 85
V 86
W 87
X 88
Y 89
Z 90
0 48
1 49
2 50
3 51
4 52
5 53
6 54
7 55
8 56
9 57
2. The Loader Bar
Ideally, you would like your program to load completely before it starts executing. If it is a large program, this may mean that participants have to wait. It’s a good idea to let them know how long they will be waiting.
This is where a loader bar comes in. I actually don’t understand how loader bars work, so I suggest simply copying the first frame of Part4.fla, including all attached code. This should work. Note that when it finishes loading, it goes to and plays a frame called “Initialize.” You will want to adjust this accordingly.
There are many resources online that discuss loader bars. However, most of them involve loading one Flash file inside of another one.
3. Arrays
As in other programming languages, you will frequently want to make use of arrays. One purpose for arrays is determining the order of all the stimuli before beginning the experiment.
Now that you’ve added a loader bar, your second frame (the one called “Initialize” in Part4.fla) should contain the code
total_trials = 5;
current_trial = 1;
Change it to the following code:
total_trials = 5;
current_trial = 0;
var Stimuli = new Array();
for (i=0; i < total_trials+1; i++){
Stimuli[i]=random(3)+1;
}
var Match = new Array();
Match[0] = 0;
Match[1] = 1;
Match[2] = 0;
Match[3] = 1;
Match[4] = 0;
Match[5] = 1;
The first change is that current_trial is set to 0. This is because the first cell in a Flash array is labeled “0”.
Next, we create an array called “Stimuli”. Using a for loop, we randomly set each cell of “Stimuli” to a number between 1 and 3. There are 6 cells, one for each trial. This way, on trial N, the program cal look to the value of Stimuli[N] in order to choose the stimulus.
You will also want to change the first line of the “stim” frame from
stimulus=random(3)+1;
to
stimulus=Stimuli[current_trial];
Notice that we named the array “Stimuli”. If we named is “Stimulus,” it would then share the same name as the one we assigned to the stimulus movie clip. This causes some of the other code associated with the movie clip to malfunction. So that is something to avoid.
This new code so far does not change how the experiment runs, other than that all the stimuli are chosen in the beginning. This is probably not very useful, but serves as an example.
Next, we create an array called “Match”. We assign half the cells the value 0 and half the value 1. Change the code on the “Probe” frame to the following:
stop();
match=Match[current_trial];
if (match==1){
probe=stimulus;
}else{
ok=1;
while (ok==1){
probe=random(3)+1;
if (probe==stimulus){
}else{
break;
}
}
}
_root.attachMovie("Stim"+probe,"Probe",2);
setProperty(eval("Probe"), _x, 275);
setProperty(eval("Probe"), _y, 200);
start_time =new Date().getTime();
What has changed? Before, we randomly chose a probe, and then set match to 0 if the probe and stimulus did not match and to 1 if they did. Now, we look to the appropriate cell of the Match array. If, on trial N, Match[N] == 1, we set the probe equal to the stimulus. Otherwise, they differ.
The only new code concept is the “while” loop. While loops execute all the code within the {} brackets as while the code within the () parentheses remains true OR until the program executes a BREAK statement. In this case, ok always equals 1, so the while loop will run until it executes the BREAK statement – which can only happen if the probe and stimulus do not match, which is what we want.
The purpose of this code is to make sure that 50% of trials are “Match” trials and 50% are “No Match” trials. However, the pattern is fairly simple, and subjects may catch on quickly. We would like to randomize the order of the trials.
Add the following code to the bottom of the Initialize frame:
var Trials = new Array();
for (i=0; i < total_trials+1; i++){
Trials=i;
}
shuffle(Trials);
function shuffle(a) {
var i = a.length;
while (i) {
var p = random(i);
var t = a[--i];
a[i] = a[p];
a[p] = t;
}
}
First, we create an array called “Trials” and set it to the values 0 through 5. Then we execute a function called “shuffle”, with “Trials” as the argument.
Finally, we define the function “shuffle”. Although this seems out of order, it will work fine. You should be able to parse the code on your own, but basically it uses a simple shuffling algorithm to randomize the order of the cells in Trials. Instead of Trials equaling [0 1 2 3 4 5] it may now equal [3 0 4 5 1 2] or any other random permutation of those values.
How does this help? We need to change one other things. Change the second line of the “probe” frame to:
match=Match[Trials[current_trial]];
I will let you convince yourself that the program will still use each value of “Match” exactly once during the experiment, but rather than running through each cell of Match in order, the order is now randomized.
For consistency, you may wish to make a similar change to the first line of the “stim” frame.
4. Surveys/Demographics
You may want to ask your subjects a few questions. This could in theory be done by using buttons as in the examples above, but it’s less than ideal.
There are several more ways of collecting information from participants. Three include radio buttons, combo boxes and input boxes.
Radio buttons are a group of linked buttons, only one of which can be selected at any one time. Look at the “Demographics” frame of Part4.fla. The first and third questions are both examples of radio buttons.
To set up rradio buttons, first drag a radio button from the Flash components window (or from your file’s library, if it already contains radio buttons). Make as many copies as you need.
Select one of the radio buttons. In the properties inspector, choose “parameters”. There are several you will want to change. “Data” contains the value of that button when selected. In Part4, the “Female” button’s data is “female”, while the “Male” button’s data is “male”. This will be more clear shortly. “groupName” is the name of the group. Radio buttons that share the same groupName are automatically part of the same group. One one can be selected at a time. “Label” is the text that is displayed to the subject. Try changing this and its function will be clear.
A combo box is slightly more complicated to set up. Again, drag a combo box onto your stage. In the properties inspector, change it’s name to age_box. Now, in the code attached to this frame, add the following:
ageData = new Array(101);
ageData[0]="Select";
for (i=1; i<101; i++) {
ageData[i]=i;
}
age_box.setDataProvider(ageData);
This creates an array with the values [‘Select’ 1 2 3 4 … 99 100]. This array is then assigned as the values of the combo box. If you test this frame, you will see that the default for the combo box is the first value (“Select”), and by scrolling you can choose any number from 1 to 100.
The third question is again made of two radio buttons, which have the values of “yes” and “no”. There is one interesting technique used here. The question “Do you have normal or corrected to normal vision?” is actually complicated, and not everybody understands it. However, including the entire explanation involves adding a lot of text, decreasing the chances that the subjects will actually read it.
So I added an invisible button underneath the text “(Click for explanation)”. The text is a dynamic text box called “explain”. The button contains the following code:
on (release){
_root.explain = "If your vision is normal when wearing glasses or contacts, answer 'yes'.";
}
Thus, if the participant clicks in the vicinity of the text box (to be accurate, if they click the invisible button), the text box’s text changes to a brief explanation.
Finally, we have an example of an input box. You create an input box the same as a static or dynamic text box, but in the properties inspector, you choose “input text” instead of “static text” or “dynamic text”. You should type “Initials” into the var box in the property inspector in order to name the data contained in this box, just as you would for a dynamic text box.
You can also type in a default value. Since I want 3 initials, I typed in “XXX”.
Finally, you need a way for subjects to submit their responses, and you need a way of recording that information.
I have included a button called “continue1_btn”, labeled “Continue”. Now, let’s look at the full code for this frame:
stop();
ageData = new Array(101);
ageData[0]="Select";
for (i=1; i<101; i++) {
ageData[i]=i;
}
age_box.setDataProvider(ageData);
demoBtn = new Object();
demoBtn.click = function(evt) {
age = age_box.getSelectedItem();
sex = sex_group.getValue();
normal_vision = vision_group.getValue();
initials = Initials;
good_form = 1;
if (sex == undefined) {
good_form = 0;
}
if (age == "Select") {
good_form = 0;
}
if (normal_vision == undefined) {
good_form = 0;
}
if (initials == "XXX"){
good_form = 0;
}
if (good_form == 1) {
gotoAndPlay("Instructions");
}else{
warning="Please finish all questions before continuing.";
}
}
continue1_btn.addEventListener("click", demoBtn);
The first part we have already gone over. Then we define a new object called “demoBtn”. Then we write an event handler to handle the event that the demoBtn is clicked. It first retrieves the data from the page. “age” is set to the value of the age_box. The value is literally whatever the subject selected. If they selected “74”, then the value is “74”. Then, “sex” is set to the value of the sex_group. Recall that using the property inspector, we set the “data” assigned to one radio button to “female” and the other to “male”. Thus, if “Female” is selected, the value of “sex” will be “female”. “normal_vision” is set by a similar process. Finally, “initials” is set to the value of whatever is typed into the input text box named “Initials”.
It’s important to make sure that the participants filled everything out. We make a dummy variable called “good_form” and set it to 1. Then we check each variable in turn. If it is undefined (in the case of radio buttons) or still set to its default values (in the case of the input text box or the combo box), we set “good_form” to 0.
Finally, if “good_form” = =1, we go on to the next frame. If it does not, we don’t. However, if nothing happens when the subject clicks “continue”, they may not realize it’s because they still have stuff to fill out. They may think the program is broken. So in the case that good_form == 0, we set a dynamic text box to “Please finish all questions before continuing.” That dynamic text box is at the bottom of the screen and is called “warning”. Notice that it must be set as “multiline” in the property inspector; otherwise, not all the text will be visible.
----
The working version of Part4 in .swf form can be found here.
Games with Words in Taiwan
I've been in Taiwan for two weeks, and further posts of the Tutorial will probably wait until I get back next week.
I had an excellent two-day visit to Prof. Su Yi-ching's lab at Tsing Hua University (Qinghua for you pinyin-readers), where I was able to collect an absurd amount of data due to the generosity of Prof. Su and her students (over 110 participants in two written studies, plus three in an eye-tracking study). I also had a great time at Prof. Lee Chia-Ying's very lively lab at Academia Sinica, where I got to observe a kid ERP experiment (something I've never actually seen, though I'm in the process of planning one of my own) and also test several more participants in the eye-tracking study. I also visited Prof. Chueng Hintat at National Taiwan University. I was mildly surprised to discover I actually can discuss my research in Mandarin when necessary, though with most people it was possible to use English (thankfully).
I wasn't at all sure how this trip was going to go when I planned it, as at the time I didn't actually know any psycholinguists in Taiwan. It turns out that there's actually a pretty substantial group of developmental psycholinguists working on interesting problems. Su and Cheung are both in the process of releasing much-needed new child corpora, with Su focusing on (if I remember correctly) optional infinitives (to the extent such can be recognized in a language with no inflectional morphology) and lexical tone, and Cheung focusing on argument structure alternations. Lee's lab is producing some really well-considered studies of character-reading (for instance, looking at how phonetic and semantic radicals are processed). I also heard of several other faculty doing exciting work but whom I didn't have time to visit.
And, of course, I got a lot of data, which is good since Harvard partly funded this trip on the expectation I would run some experiments. The experiments I was running are all similar to the Pronoun Sleuth project -- that is, looking at factors that affect what people think a pronoun means, and trying to replicate some of my findings in English.
Class Notes: Why linguistic judgments are fuzzy
Buried towards the end of a 1991 paper by Fisher, Gleitman & Gleitman is a strikingly useful -- and I think, correct -- observation on the limits of grammaticality studies. In the context of a broader argument that people learn the meanings of verbs partly from the syntactic frames the verbs appear in ("syntactic bootstrapping"), they argue that exactly this "feature" of verb learning makes it sometimes hard to decide if a particular verb is grammatical in a certain context.
Consider the present progressive in English. Classically, the present progressive can only be used for ongoing activities (1-3), not completed activities (4) or states that aren't typically activities (5):
(1) Sarah is eating the carrot.
(2) Sarah is running to the store.
(3) Sarah is looking at the moon.
(4) *Sarah is breaking the vase.
(5) *Sarah is seeing the moon.
However, a lot of people's judgments about (4) and (5) are iffy. They don't sound nearly so ungrammatical as (6).
(6) The boys carrot eats.
The idea is that people are influenced by the syntactic frame the verb appears in and reinterpret the verb. That is, if you think of "breaking" as something that happens in an instant, it isn't an activity and you can't say (4). However, if you imagine a long, drawn-out process in which Sarah methodically destroys a vase, "break" is now an activity, and (4) is fine. Similarly, "see" usually describes an end-state of some process, but you can re-imagine it as an activity (maybe Sarah observes the moon regularly as part of her profession).
I run into this constantly in my study of verbs of psychological state. Influenced by a paper by Liina Pylkkanen's 1991 "On stativity and causation," I've been pursuing the argument that certain psych verbs can't appear in certain syntactic frames. For instance, "love" and "hate" can't appear in the present progressive. In a sense, this seems right; (7) and (8) are somewhat more odd than (9) and (10).
(7) *John is loving the Red Sox.
(8) *John is hating the Yankees.
(9) John is frightening the squirrels.
(10) John is angering the chickens.
Unfortunately, one can usually find a way of reinterpreting "love" and "hate" such that they are activities and then (7) and (8) don't sound so bad. This has made testing the hypothesis difficult. In addition, English appears to be changing to allow more psych verbs in the present progressive (darn you, McDonalds).
-------
Fisher, C., Gleitman, L. R., & Gleitman, H. (1991). On the semantic content of subcategorization frames. Cognitive Psychology, 23, 331-392.
Class Notes: This field confuses the hell out of me. I want to start from scratch.
I have now read 44 papers in the course of this semester's Language Acquisition seminar. The only firm conclusion I have come to is that language is so complicated that nobody could ever possibly learn one.
---
(The title of this post comes from the caption of a doodle of a mid-century Harvard psychologist, now enshrined in a display case on the 9th floor of William James Hall. Based on the time period, I think the doodler was either George Miller or Roger Brown, but I can't recall for sure.)
---
(The title of this post comes from the caption of a doodle of a mid-century Harvard psychologist, now enshrined in a display case on the 9th floor of William James Hall. Based on the time period, I think the doodler was either George Miller or Roger Brown, but I can't recall for sure.)
Adoption and Language Development
I just heard that the Boston Globe recently ran an article on my advisor's work. If you haven't already read it, here's my discussion of the same work in Scientific American Mind.
Class Notes: A Developmental Paradox
One thing that keeps coming up in artificial grammar studies (in which people are taught bits of made-up languages) is that adults are much better at learning them than kids. Yet we know that if you wait 20 years, people who started learning a real language as a kid do much better than those who started as adults. This might mean the artificial grammar studies aren't ecologically valid, but I think it's also the case that in real-life second-language acquisition, adults start out ahead of kids. Whatever makes kids better language learners seems to be something that happens after the first few weeks/months of learning.
Web Experiment Tutorial: Chapter 3, Basic Flash Programming
Several years ago, I wrote a tutorial for my previous lab on how to create Web-based experiments in Flash. Over the next number of months, I'll be posting that tutorial chapter by chapter.
This and the following two chapters will go over how to produce a basic change-detection experiment. Necessary materials and the finished example are included.
1. How is a Flash program structured?
If you have ever done any programming, you will find the layout of a Flash program rather odd. This is because it is designed for animations.
A Flash program is structured around frames. Frames are what they sound like – a frame in a movie. A frame may contain images. It also has attached code. That code is linked to that frame and that frame only, although subroutines written in one frame’s code can be called by another frame.
Moreover, a frame can contain movie clips. Movie clips is a very confusing name for these structures. What you need to know about them for the moment is that they can have their own timeline and their own attached code.
2. Exploring Flash
Note: This tutorial was written for Flash MX with Actionscript 2.0. I believe everything will work as it should in newer versions of Flash, but if you have any problems, please leave a comment or email me.
Open a new Flash document. The main window contains two parts. At the top, there is a timeline. This timeline shows all the frames in your program. Currently, the first frame should be highlighted and have a circle in it. The other frames should all be faded in appearance. They are just placeholders and will not appear in a movie. The circle in the first frame indicates that it is a keyframe, which will be discussed below.
At the bottom of the Timeline, you will see the letters “12.0 fps”. This is the speed of the movie: 12 frames per second. 12 fps is standard. You can go faster or slower as you wish. However, this is a ballpark figure – actual speed depends on many factors. Supposedly there are ways to improve the accuracy of the timing, but I have never tried or tested any of them. It is also worth noting that there does seem to be a maximum speed. As the fps increases, the actual speed when running does not necessarily increase. Also, at high speeds, the program will run faster when run locally (i.e., on your desktop) than when run through the Internet.
The central, larger part, is the stage. This shows you what is actually displayed in a particular frame (unless those images are dynamically created, which will be discussed below).
There are several popup windows you will want to have at your disposal. Make sure they are checked off under the “Window” menu item. These are:
Properties. The property inspector allows you to modify anything that is selected on the stage or in the timeline. Click on the stage itself, and you will see several options in the properties window. The most important one is the stage size. Default is usually 550 x 400. In general, it is better to keep your stage small, since you do not know how large the screen of your participants will be.
Select Window->Development Panels->Actions to bring up the Actions window. This window contains all the code that is linked to whatever you currently have selected, be in frame, movie clip or component. Note that the search function only searches that code. Currently, there is no way to search through all the code in a given program.
Select Window->Library to open the library. The library contains any components used in your program. This will be important later.
3. Displaying stimuli.
First, change the fps to 4. This will make the math simpler.
Now, we will create a background layer.
Choose Insert->Timeline->Layer to add a new layer.
In the Timeline, select Layer 1. Using the drawing tools, draw a rectangle of any size. In the properties window, click the “fill” icon. In the popup window, click on the color wheel. In the new “colors” window, select the “sliders” button. Below that, change “Gray Scale Slider” to “RGB Slider”. This allows you to type in exact RGB values. Type in 145 for Red, Green, and Blue. Click “OK”. Now, in the properties window, change the width and height of the rectangle so that it matches the size of the stage. Make sure the X and Y coordinates are 0. Now, you can change the foreground layer without affecting the background, and visa versa. In this example, the background is a neutral gray, but it could be much more complicated and even dynamic. To lock the background so you don’t accidentally edit it, do the following. In the timeline, just after the words “Layer 1”, you should see a couple diamonds. One is under the “Eye” column. One is under the “lock” column. Click the diamond under the “Lock” column. This locks the layer. (The “Eye” diamond toggles the visibility of the layer.)
Now we want to add some stimuli. Make sure you have Frame1 and Layer 2 selected. Go to File->Import->Import To Stage and import Stim1.pic. If asked to import via QuickTime, click OK.
Click on the image. Go to the properties inspector and change the X coordinate to 75 and the Y coordinate to 50. This will center the 400 x 300 image on a 550 x 400 stage.
Now, click on the 2nd frame of Layer 2. Go to Insert->Timeline->Blank Keyframe. (Inserting a non-blank Keyframe would make a new keyframe that contains the same images as the current one.) The second frame should now be a keyframe.
Now, click on the 3rd frame of Layer 2. Go to Insert->Timeline->Frame. Now, there should be a box around frames 2 and 3. You’ve now made frame 3 active, but it is not a keyframe. This means it cannot be modified independently of the keyframe in frame 2. Now click Insert->Timeline->Blank Keyframe. Notice that this converted your frame to a keyframe. It did not actually “insert” anything.
Notice also that our background does not appear when we select frames 2 or 3. This is because Layer 1 only has a single frame. You will need to expand Layer 1. Click on frame 3 of layer one and click on Insert->Timeline->Frame. Now the background should appear on all 3 frames.
Now, import Stim2 to the 3rd frame of Layer 2. Center it as before.
Now, test your “experiment” by clicking Control->Test Movie. The movie, you will notice, loops. As soon as it gets to the end, it goes back to the beginning. This won’t happen when it is run from a website, but it is still annoying. Let’s add some code to prevent this.
Close the test window and click on the 3rd frame of Layer 2. Now go to the “Actions” window and type:
stop();
This ActionScript pauses the timeline in the current frame. However, code that appears after the “stop” command will still be executed.
Now test the experiment. You probably will have trouble seeing the first stimulus. This is because Flash starts playing even before the program is fully loaded. In the future, we will add a “loader” to fix this problem. For now, however, just add several blank frames to the beginning of the experiment.
Test the experiment. It is now a basic change-detection experiment. It has several problems, however, the first of which is that there is no way for the participant to respond.
4. Getting responses.
There are two ways to input responses: with the mouse and with the keyboard. Because the experiment is on the Web, the more natural method seems to be using the mouse. However, to get accurate reaction times, keyboard entry is probably preferred. That will be discussed below, under “Getting Reaction Time”.
Select the final frame of Layer 2. In the same floating window as the one that shows the library, expand the “components” window. Drag the “button” component onto the final frame of Layer 2. Put it somewhere that it will not interfere with the image itself. In the property inspector, change the label to “Same”. The “button” component should now be in the program library. Drag a new instance of the button component onto the stage and change the label to “Different.”
Select the “same” button. In the Actions window, add the following ActionScript:
on (release){
_root.correct = 0;
_root.gotoAndPlay('feedback');
}
This subroutine will execute when the user clicks on the button and then releases the mouse button. Then, it sets a variable called “correct” to 0, since the stimuli in fact are not the same. This variable is attached to the main program, which is why it is prefixed by “_root.”. Similarly, the command “gotoAndPlay(‘feedback’)” is attached to the main program, since the frame “feedback” is part of the main program. “gotoAndPlay” does what it sounds like: it tells Flash to go to the frame called “feedback” and start playing from that point. The “AndPlay” part is important, because currently we’ve told Flash to pause playing.
To the “different” button, add:
on (release){
_root.correct = 1;
_root.gotoAndPlay('feedback');
}
Of course, there isn’t any frame called “feedback.” Add a blank keyframe to the end of the experiment. In the property inspector, name it “feedback”. In the center of that frame, draw a text box. In the property inspector, make sure it is dynamic text, not static text. Under “var”, type “feedback_text”.
In the Actions window for the “feedback” frame, add the following code:
stop();
if (correct==1){
feedback_text='Correct';
}else{
feedback_text='Incorrect';
}
Notice that we don’t need to use _root. This code is already attached to the “root”. Also notice the use of the double equals sign. If you accidentally type:
If (correct=1){
The variable “correct” will actually be set to 1.
Play this experiment. If you respond “Same,” you should be told that this response was incorrect. If you respond “Different,” you should be told that this response is correct. You may want to compare your work to the demo.
Note: Here and elsewhere, if you'd like the original .fla file to look at, please email me at gameswithwords@gmail.com
Our experiment has only one trial. You could add trials manually by adding new frames. This isn’t very efficient, and it also doesn’t allow for any randomization. In the next part, we’ll add these aspects.
5. Creating a dynamic experiment.
To dynamically choose which stimuli appear, we will need to convert them to symbols.
Go to the frame with Stim1. Right-click on the copy on the stage and select “Convert to Symbol”. In the dialogue, name the symbol “Stim1”. Make it a Movie Clip. Under “Linkage”, first select “Export for ActionScript”, then change the Identifier to “Stim1”. This is the name you will use to refer to this Movie Clip in the code.
Now double-click on Stim1. The Timeline will now show Stim1’s timeline (remember that movie clips have their own timeline). All our movie clips will consist of a single frame, but remember that you have the option to make a movie clip more dynamic. In the property inspector, change the X coordinate of Stim1 to “–200” and the Y coordinate to “-150”. This centers the 400 x 300 image (in the future, you can see what happens if you skip this step). Now go to Edit->Edit Document.
Repeat this process for Stim2. Drag Stim3 onto the stage somewhere and repeat the process. Now, delete the images of Stim1, Stim2 and Stim3 from whatever frames they appear in.
Name the frame where Stim1 was originally presented “stim”. Name the frame where Stim2 was originally presented “probe”.
In the frame “stim”, the ActionScript should read as follows:
stimulus=random(3)+1;
_root.attachMovie("Stim"+stimulus,"Stimulus",1);
setProperty(eval("Stimulus"), _x, 275);
setProperty(eval("Stimulus"), _y, 200);
First, a random number from 0 to 2 is chosen, to which we add 1. _root.attachMovie attaches a movie clip to the frame. The first argument (“Stim”+stimulus) names the movie clip. Notice that possible values are “Stim1”, “Stim2” and “Stim3” – our three stimuli! The second argument is a name for this instance. The final argument determines which movie clip level the movie clip is assigned to. If there is already a movie clip on level 1, this will overwrite it. Bugs in Flash very often result from overwriting a movie clip in this fashion.
Next, we position the movie clip in the center of the screen (275, 200) by setting the X and Y parameters. Note that if the movie clip image itself is not centered (as we did above), the outcome will be different. For instance, if the origin of the movie clip is it’s upper left corner, then you would need to place this instance at (75,50) in order to center the instance on the stage.
In the next frame, add the following code:
removeMovieClip("Stimulus");
This removes the movie clip we just added. Note that it removes it using the name we assigned it in the previous frame.
In the “Probe” frame, change the code to the following:
stop();
probe = random(3)+1;
if (stimulus==probe){
match=1;
}else{
match=0;
}
_root.attachMovie("Stim"+probe,"Probe",1);
setProperty(eval("Probe"), _x, 275);
setProperty(eval("Probe"), _y, 200);
Now, the probe is chosen randomly from the 3 stimuli. When the stimulus and the probe match, this is noted. Notice that the stimulus and probe will match 1/3 of the time. 2/3 of the time, they do not. This is done here to simplify the programming, any ratio can be implemented.
We also have to change the code for our response buttons. It is no longer the case that “different” is always correct and “same” is always wrong. Modify the code for the “Same” button as follows:
on (release){
if (_root.match==1){
_root.correct = 1;
}else{
_root.correct = 0;
}
_root.gotoAndPlay('feedback');
}
Modify the code for the “Different” button similarly.
Finally, add this code to the top of the Feedback frame:
removeMovieClip("Probe");
Test the experiment. There is still only one trial, but the stimuli should now be chosen randomly.
Writing a loop so that there are multiple trials is fairly straight-forward. First, add a blank keyframe to the beginning on Layer 2. Add the following code:
total_trials = 5;
current_trial = 1;
This initializes two variables. total_trials sets the total number of trials. current_trial tracks how many trials have been completed.
Now, name the second keyframe of Layer 2 “Next_Trial”.
Remove the stop() command from “feedback” and add 2 frames. Convert the final one to a keyframe (don’t change it to a blank keyframe – we want the feedback_text to continue to display on this final frame). Add this code to that new keyframe:
if (current_trial==total_trials){
gotoAndPlay('finish');
}else{
current_trial += 1;
trace(current_trial);
gotoAndPlay('Next_Trial');
}
This code does pretty much what it says. Now we need to add a final frame to Layer 2 and call it “finish”. Draw a textbox on the stage and write, “Thank you for participating.”
Your program should now look like this.
We are still not recording any data. That will be discussed in a future chapter.
Web Experiment Tutorial: Chapter 1, Overview
Several years ago, I wrote a tutorial for my previous lab on how to create Web-based experiments in Flash. Over the next number of months, I'll be posting that tutorial chapter by chapter.
1. What does this manual cover?
- Methodological considerations
- Creating experiments in Flash
- Implementing those experiments on the Internet
- Collecting and retrieving data
- Recruiting participants online
2. What does this manual not cover?
- Creating experiments in Java or other technologies
- Basic programming skills
i. (You should be familiar with variables, arrays, subroutines, functions, etc. Familiarity with object-oriented programming is useful but hopefully not necessary.)
3. Who should use this manual?
- Researchers who want to create and use Web-based experiments.
- Those who are simply interested in the methodology should read “Methodolgical Considerations” and “Recruiting participants online” first/only.
Subscribe to:
Comments (Atom)